Customer Attributes
Demo : https://video.tv.adobe.com/v/27819?quality=12
Feature under People Tab , used to upload offline customer specific (CRM) data with no PI information.
Pre-requisites:
1. ECID/MCID deployed in your website. (Identify visitor across adobe solution)
2. Capture CRM ID/customer ID from page(To identify and map customer who logged in to site and customer attribute data)
3. Database with information about your customers, which you will want to use in the Adobe Experience Cloud i.e for CRM file upload(CRM data CSV feed)
1. ECID /MCID implementation :
Using Launch :
Install Experience Cloud ID Service extension in launch

2. Capture CRM ID/customer ID from page
If you have a log-in page, the next thing you must do is add all the needed code to set a cookie or an entry in the data layer with the CRM ID.
Sending the CRM ID to Adobe
I assume that, by now, you have a log-in page and, once the user has identified himself, there is CRM ID available on all pages. The next step is to send this CRM ID to Adobe’s servers.
Using Launch
You first need to create a data element to read the CRM ID from wherever it is stored. In this example, I use a cookie named “externalId”:

Then, in the Marketing Cloud ID Service settings page, set a customer setting as follows:

The “Integration Code” comes from two different places, depending on the case:
- Customer Attributes: alias ID
- Adobe Audience Manager: data source (usually set as cross-device) integration code
If these last two concepts seem alien to you, I will explain them in the future. However, do not just use “crm_id” as the integration code, unless this is exactly your case.
The “Value” must be the data element you have just created and the Auth State should always be “Authenticated”.
There is one caveat though. DTM executes the MCID code at the top of the page. However, the CRM ID is not always available at the top of the page, before the DTM code is executed. In this case, instead of using “Customer Settings” as above, you will need to create a page load rule, which executes at the bottom of the page and only when there is a CRM ID available. This rule will just contain JavaScript:
_satellite.getVisitorId().setCustomerIDs({
    "crm_id":{
        "id": _satellite.getVar("customer_id"),
        "authState": Visitor.AuthState.AUTHENTICATED
    }
});
3. Setting up Customer Attributes

After you click on “+ New”, the wizard takes you through the configuration process:
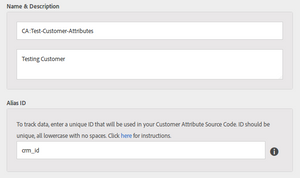 Name. Any text will do, but I strongly suggest you follow a naming convention.
- Description. Long description of this customer attribute.
- Alias ID. This parameter must be one single string, with just ASCII lower characters and no spaces. It can be any string not used before. Once you have decided which one to choose, send it to your web and app developer. This is the value to be used in the key for
visitor.setCustomerIDs(). Review my post on capturing the CRM ID to see how to do it.
You now need a sample file with the contents of your customer attributes, which must be in CSV format. It does not have to contain your full customer base, just a few to start the engine. You just need to drag and drop it in the “File Upload” section and wait a few seconds.
crm_id,Gender,Lifetime value,City
1,Male,1240,London
2,Female,500,Manchester
You can now click on “Validate Schema” to check whether the data has been correctly processed. You can change the details, but, in general, it is not necessary.

Automating
You might be wondering how to update the values automatically. You probably have thousands or millions of customers and their attributes change every day. All I have shown so far is how to manually upload a file. For automation, you need to create an SFTP account following these steps:

Customer Attributes for Adobe Analytics
So, you have your Customer Attributes configured. Now what?
The first use case is with Adobe Analytics. You can use this feature to further analyse your known customers. In the good old days, the typical solution was to capture the CRM ID in an eVar or a prop when a user logged in. Then, you would create a classification of this variable and upload the corresponding files. This solution had a couple of issues:
- Only the first 500,000 customers every month would be available in Reports & Analytics. If your customer base is much higher than this number, you would get a lot of “low traffic” values. The only solution was to get a DWH report, which could take a few hours.
- An eVar or a prop had to be used. When there were only 50 or 75 of these variables, it was not that uncommon to reach the limit.
Using Customer Attributes lifts these two limitations: you can now report on all CRM IDs and you do not need any custom variables. However, a new limitation is added: only a certain number of attributes are available, depending on your license. At the moment of writing, 3 for Analytics Standard and 200 for Analytics Premium.
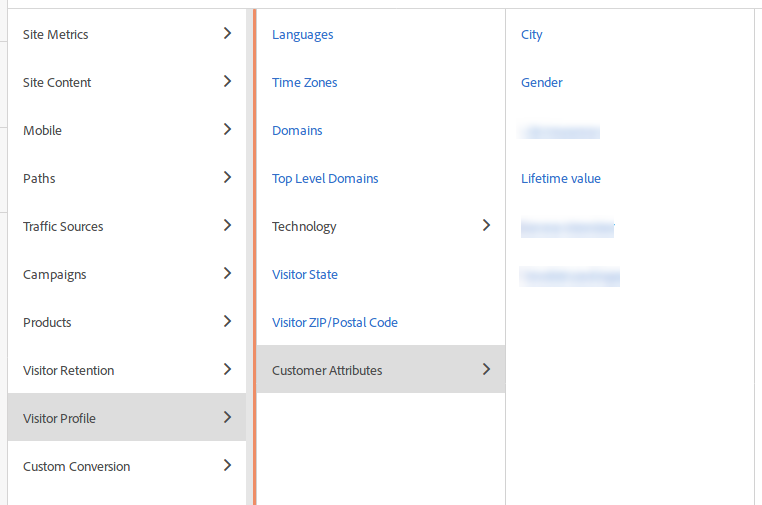
When you enable Customer Attributes, you get a new menu entry under “Visitor Profile”:
These variables behave very much like an eVar, which can also be used in sub-relations. You just need to remember that only the last value prevails in the reports. If you upload a new file, it will overwrite all previous values.
Customer Attributes for Adobe Target
In the case of Target, the typical use case in Target is personalisation of the website for known customers. Target had its own solution, which was very specific to it and did not integrate with other Marketing Cloud solutions. It is not recommended any more and the new approach is to use, you guessed it, Customer Attributes! Basically, you just create audiences based on these attributes and, for each audience, you assign an experience. When creating the audience, you need to select the “Visitor Profile” section. Obviously, this only works after the user logs in.
Refer : https://www.pedromonjo.com/2017/07/customer-attributes.html


No comments:
Post a Comment